

The horse shelter posed more of a conundrum than the fence. There is no access to natural shelter and while the weather here is mild, they need somewhere to get out of the sun at the least.
Buying a shelter would be the easiest and quickest solution, but at around $1000 for a 10×10 box, it was a bit steep for a rental property. They aren’t easy to lift and we would likely have to leave it behind if we ever moved.
DIY it would have to be and so we scoured the internet for ideas. I finally found one I didn’t completely hate and got busy securing supplies and then modifying it to suit our needs. Below you will find the likely only DIY post you’ll see on here. I’m just not much of a creator.
Supplies:
Pallets – we used 16 that were 27×40. Normal ones are supposed to be 48×40.
T posts – 16
Cattle panel -4
Tarp – 16×20
Screws
Braces – 18
Zip ties
Plywood – 4 sheets


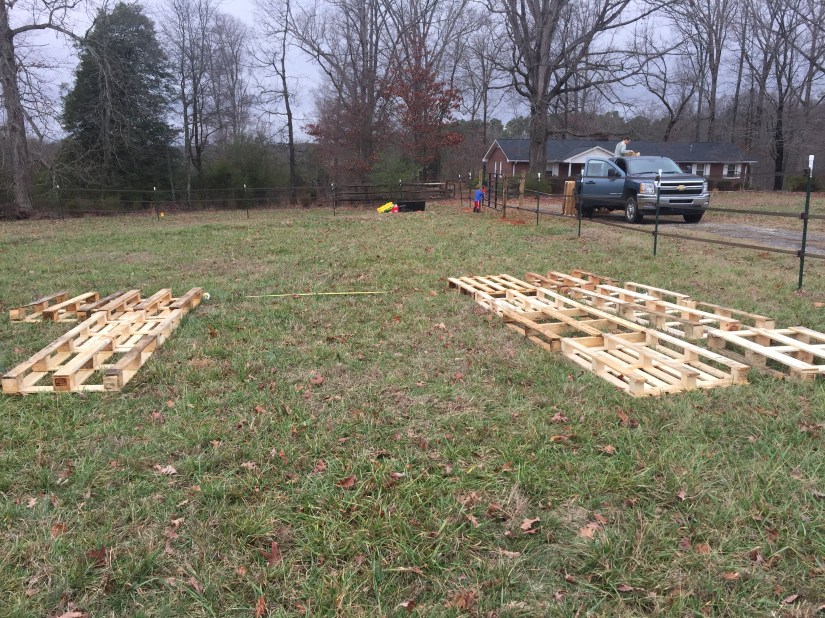
A truck full of pallets and a dog happy to help.
Step 1:
Create the first wall by placing a T post in at one end then place a pallet over it. We didn’t think this was as stable as we would like so we added a second t post to each pallet.


With the size of pallets we could find the height wouldn’t be high enough, so we took another set of panels and cut the top off to get our walls 48″ high. If you can find pallets of normal size, you can skip this.


Step 2:
Optional step because we stacked the pallets. I went and screwed in a metal brace to connect the top and bottom pallets (two went into the end pallets). I also went ahead and added a brace connecting each pallet horizontally. I just felt much more comfortable with the stability with everything screwed together.

Step 3:
Now it becomes a two person job. Take one of the 50ft cattle panels and create the roof. Start at one end lining the end of the panel up to the end of the pallet wall. The best technique we found was to rest the panel against the top horizontal slat of the pallet. I would hold that end and Dusty would go to the other to jam it into its resting spot.


Attach the panel to the pallets with fence staples. Tip here: whoever isn’t hammering in the staple should go to the outside of the pallet and lean into it while grabbing the metal panel and pulling it hard to you. This helps the person hammering in the staple and gets a tighter fit.


For our 16ft wall length, four cattle panels fit perfectly with one square overlap to each.
Step 4:
This also requires two people and was the trickiest part. Stretch the 16×20 tarp over the cattle panel and attach with zip ties.
In a way it was great that we built this on an insanely windy day. While it made it hard to secure the tarp, it showed us when we had it taut enough.
The hardest part was getting it over the 10ft peak. Neither of us were tall enough to reach. What we ended up doing was loosely attaching on side to the pallets at both ends then attaching a lead rope to the opposite side and using that to pull it over. Be careful it doesn’t catch on the panel and rip.


We then attached it to the wooden pallets along one wall pulling it as tight as we could. Next we returned to an open end and attached the tarp to the panel along the peak with more zip ties making sure to pull it both toward us and to the left to get it as tight as we could. Work your way down the next wall and finish up the other open end.

Step 5:
This was not included in the directions, but I wasn’t comfortable having the slats open on the inside where the horses could potentially get a hoof or leg stuck. Our last step was to place plywood along the interior walls with long screws to make a kickboard.
After that we were all finished. It will provide protection form wind, rain and sun. You could close in one end to make a 3 sided shelter, but we decided to leave ours open.

Overall I like it as a temporary shelter. You can make it as large as you want and it is super easy to take down and move. Even easier if you don’t add the braces. It probably took us a half a day. Plan on roughly 4-5 hours with two people and 6-7 if you do it by yourself (although you need two people for the cattle panels and tarp)
Total cost was around $300.

I have to tell you that I am loving these “Sara builds her homestead” posts so much. Great, affordable alternative to pre-made horse shelters. I hear you about pumping too much money into a rental. I debate doing things to the horse property here sometimes. Then I remember that I don’t own it and can’t take the improvements with me when we go.
LikeLike
I’m glad you like them. I’m not typically a DIY type of person but I also don’t have a bunch of money to spend either. I don’t mind putting blood sweat and tears into a propnerty but putting permanent structures up that will just increase the property value for someone else doesn’t seem like a good idea.
LikeLike
I’m really interested to hear how this holds up over time!
LikeLike
I think the tarp will be the first to give way. We bought a really cheap one mostly because I hate the color and hope to find a heavier duty one in silver or white.
LikeLike
Looks great! That sounds like a lot of work though so it may be beyond me. How did you source cheap pallets? They’re either expensive or broken around here.
LikeLike
Craigslist. They were $2 a pallet. It really isn’t bad. You could skip the metal braces and if you find pallets 48″ high you won’t need to stack them.
LikeLike
I hadn’t thought to look on CL for pallets. I really hate dealing with people on CL, but that does seem like a good way to get them.
LikeLike
HA! How neat to see your version of this – love it. Dan and I will be building two pallet run ins on his property in coming months. Pallets are FREE around here if you can go pick them up where they’re awaiting removal. He’s got lots of locust posts from timbering his property, too, so we’re going to frame out the sheds with those. Will definitely do the T-post in the middle bit that you did for added support! And the plywood. Our roof will be corrugated metal sheeting though. I love your idea, but that wouldn’t fly here where we can get sustained 25-40 mph winds in the winter (see: last weekend lol). Thank you for the photo-heavy how-to post. Great to see these kinds of things implemented by folks I know instead of just on Pinterest. =)
LikeLike
Yeah…the weather here is pretty darn mild. The wire and tarp would probably collapse under the weight of snow too.
LikeLike